
Hunter's Star Quilt Block - Quick & Easy Tutorial

If you love combining seasonal crafts with practical home décor, creating a Halloween Pattern Black Cat Fabric Coaster is a perfect project.
Using a Halloween pattern, you can craft coasters that are not only functional but also festive and charming. Black cats are a classic symbol of Halloween, and incorporating them into fabric coasters adds a playful yet stylish touch to your seasonal decorations.
With this guide, you’ll learn how to make your own Halloween Black Cat fabric coaster, explore different techniques, and even customize it to match your home décor.
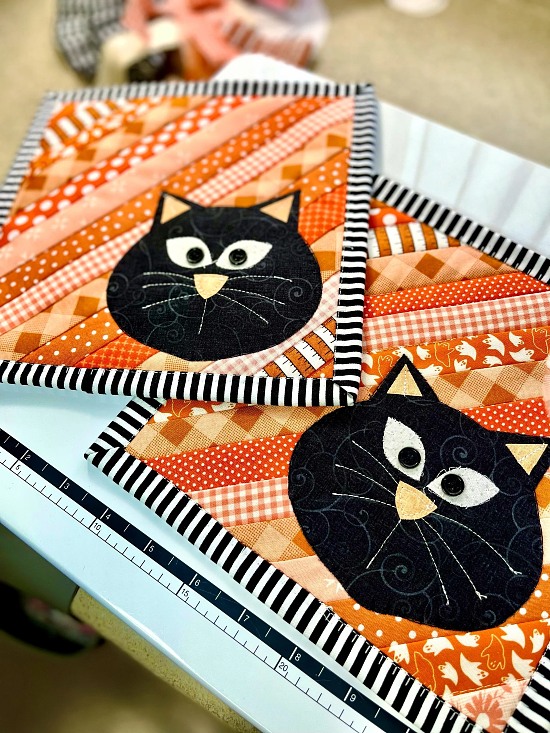
Making a Halloween fabric coaster is a fun way to celebrate the holiday while practicing your sewing and crafting skills. A Black Cat Halloween pattern gives clear instructions for cutting, stitching, and assembling fabric pieces, making it suitable for both beginners and experienced crafters.
Whether you want to make a single coaster as a gift or create a set for your Halloween party, this project allows you to combine creativity with practicality.
Using a Halloween pattern Black Cat fabric coaster also opens the door to exploring different fabrics, colors, and embellishments. From cotton prints to felt, the material you choose will affect the texture, durability, and overall aesthetic of your coaster. Following a detailed pattern ensures that each piece aligns properly, creating a polished, professional look. By learning these techniques, you’ll be able to produce a collection of DIY Halloween coasters that are both fun and functional.
The first step in making a Halloween Pattern Black Cat Fabric Coaster is selecting the appropriate materials. Cotton fabric is ideal because it is easy to cut, sew, and clean. Choose fabric colors that enhance the black cat motif, such as orange, purple, or classic Halloween prints.
You will also need coordinating thread, scissors, pins, a sewing machine (or needle for hand stitching), and interfacing for added sturdiness. Using interfacing ensures your coaster maintains shape and protects surfaces from heat and moisture.
Pattern placement is important. Make sure to trace your Halloween Black Cat pattern carefully on the fabric to avoid mistakes. Precise cutting ensures that the cat design is centered and aligned, giving your coaster a professional finish.
Consider layering different fabrics for added dimension. For example, black felt for the cat silhouette over patterned cotton for the background creates contrast and visual interest. This technique can elevate a simple DIY Halloween coaster into a standout decorative piece.
Color combinations matter for Halloween themes. Pairing black cats with bright oranges, deep purples, or metallic accents creates a festive yet elegant look. Your fabric coaster can coordinate with table linens, Halloween decorations, or party themes.
Finally, gather all materials before starting. Having everything organized allows for a smooth crafting process, ensuring your Halloween Black Cat fabric coaster turns out clean, neat, and enjoyable to make.
A well-detailed Halloween pattern Black Cat fabric coaster is crucial for success. Patterns usually provide step-by-step instructions for cutting, stitching, and assembling fabric pieces. Following the pattern carefully ensures that your coaster looks polished and symmetrical.
The pattern may include templates for the cat silhouette, eyes, and other decorative elements. Using a pattern reduces guesswork and ensures that each coaster you make is consistent in size and design.
Familiarize yourself with the stitch types used in the pattern. Common stitches include straight stitch, zigzag stitch, and applique techniques. Mastery of these stitches ensures that your DIY Halloween coaster is durable and visually appealing.
Understanding pattern symbols and terminology is also important. Many Halloween Black Cat patterns use abbreviations or icons to indicate stitching direction, seam allowance, and placement of details. Reading through the instructions thoroughly before starting saves time and prevents mistakes.
Adjusting the pattern for size or customization is possible. You can enlarge or reduce the cat silhouette or background fabric according to your preference, creating a personalized Halloween fabric coaster.
Lastly, double-check your traced pieces against the pattern. Accuracy at this stage makes assembling the coaster easier and ensures a professional-looking finished product.
Start your Halloween Black Cat fabric coaster by cutting the background fabric and the cat silhouette according to the pattern. Use sharp fabric scissors to achieve clean edges.
Next, layer the cat silhouette over the background fabric. Pin in place to avoid shifting while stitching. This step ensures your design remains centered and aligned.
Sew the cat silhouette using a straight stitch or appliqué stitch, following the pattern instructions. Take your time to maintain even stitching, which gives the coaster a polished, professional appearance.
Add any decorative details, such as eyes, whiskers, or additional Halloween motifs, using embroidery or fabric paint. These small touches bring your DIY Halloween coaster to life and highlight the black cat theme.
Attach interfacing or backing fabric for stability. Stitch around the edges to secure all layers together. Using coordinating thread enhances the finished look and ensures durability.
Finally, trim any excess fabric and press the coaster with an iron. The pressing step helps the layers lie flat and gives your Halloween Black Cat fabric coaster a crisp, clean finish, ready to use or gift.
Using high-quality fabrics ensures that your Halloween Black Cat fabric coaster lasts longer and looks professional. Durable cotton or felt is recommended for both background and cat silhouette.
Pin your pieces carefully before sewing. This helps avoid shifting layers and keeps your stitching aligned, giving your coaster a neat finish.
Experiment with decorative stitches. Zigzag, blanket, or satin stitches can add texture and interest to your DIY Halloween coaster.
Color contrast is key for visibility. A black cat stands out best against bright or patterned backgrounds, making the Halloween motif more striking and festive.
Take breaks while stitching to maintain even tension. Fatigue can lead to uneven stitches or mistakes in your Halloween pattern Black Cat fabric coaster.
Finally, personalize your coaster. Add glitter, beads, or fabric paint to enhance your design and create unique seasonal décor. Customizing your DIY coaster ensures each piece is one-of-a-kind.
Q1: Can beginners make this coaster?
A: Absolutely! The Halloween Black Cat fabric coaster pattern is beginner-friendly. Following the step-by-step guide ensures success.
Q2: What fabrics are best for coasters?
A: Cotton and felt are ideal. Cotton is easy to sew, while felt adds thickness and durability.
Q3: How long does it take to make one coaster?
A: Depending on experience, a DIY Halloween coaster can take 30 minutes to 1 hour.
Q4: Can I wash the coaster?
A: Yes, most fabric coasters are machine washable, but avoid high heat to preserve the appliqué.
Q5: Can I make a set for a Halloween party?
A: Absolutely! You can make multiple Halloween fabric coasters using the same pattern for a festive table setup.
Q6: Can I sell these coasters?
A: Yes, as long as the pattern is free or original. Handmade coasters are popular for seasonal gifts or crafts.
Creating a Halloween Pattern Black Cat Fabric Coaster is a fun, creative, and rewarding project. By following the pattern, selecting the right fabrics, and adding your own decorative touches, you can make coasters that are both festive and functional. From cutting and stitching to finishing and personalizing, each step contributes to a polished and charming finished product.
We hope this guide inspires your Halloween crafting. Please share your honest opinions, suggestions, and creative variations—your experiences help the crafting community grow and inspire others to try their own DIY Halloween fabric coasters.


